Back
A Guide to Recovery Machine Filter Driers
Learn how a recovery machine filter drier protects your HVAC equipment. This guide explains how they work, how to choose one, and why it's essential.
Sep 2, 2025
Sep 2, 2025
Table of Contents
Table of Contents
NOTE: This content is for informational purposes only. EPS Controls assumes no liability for what you do with this information—consult a qualified HVAC technician before making changes.
NOTE: This content is for informational purposes only. EPS Controls assumes no liability for what you do with this information—consult a qualified HVAC technician before making changes.

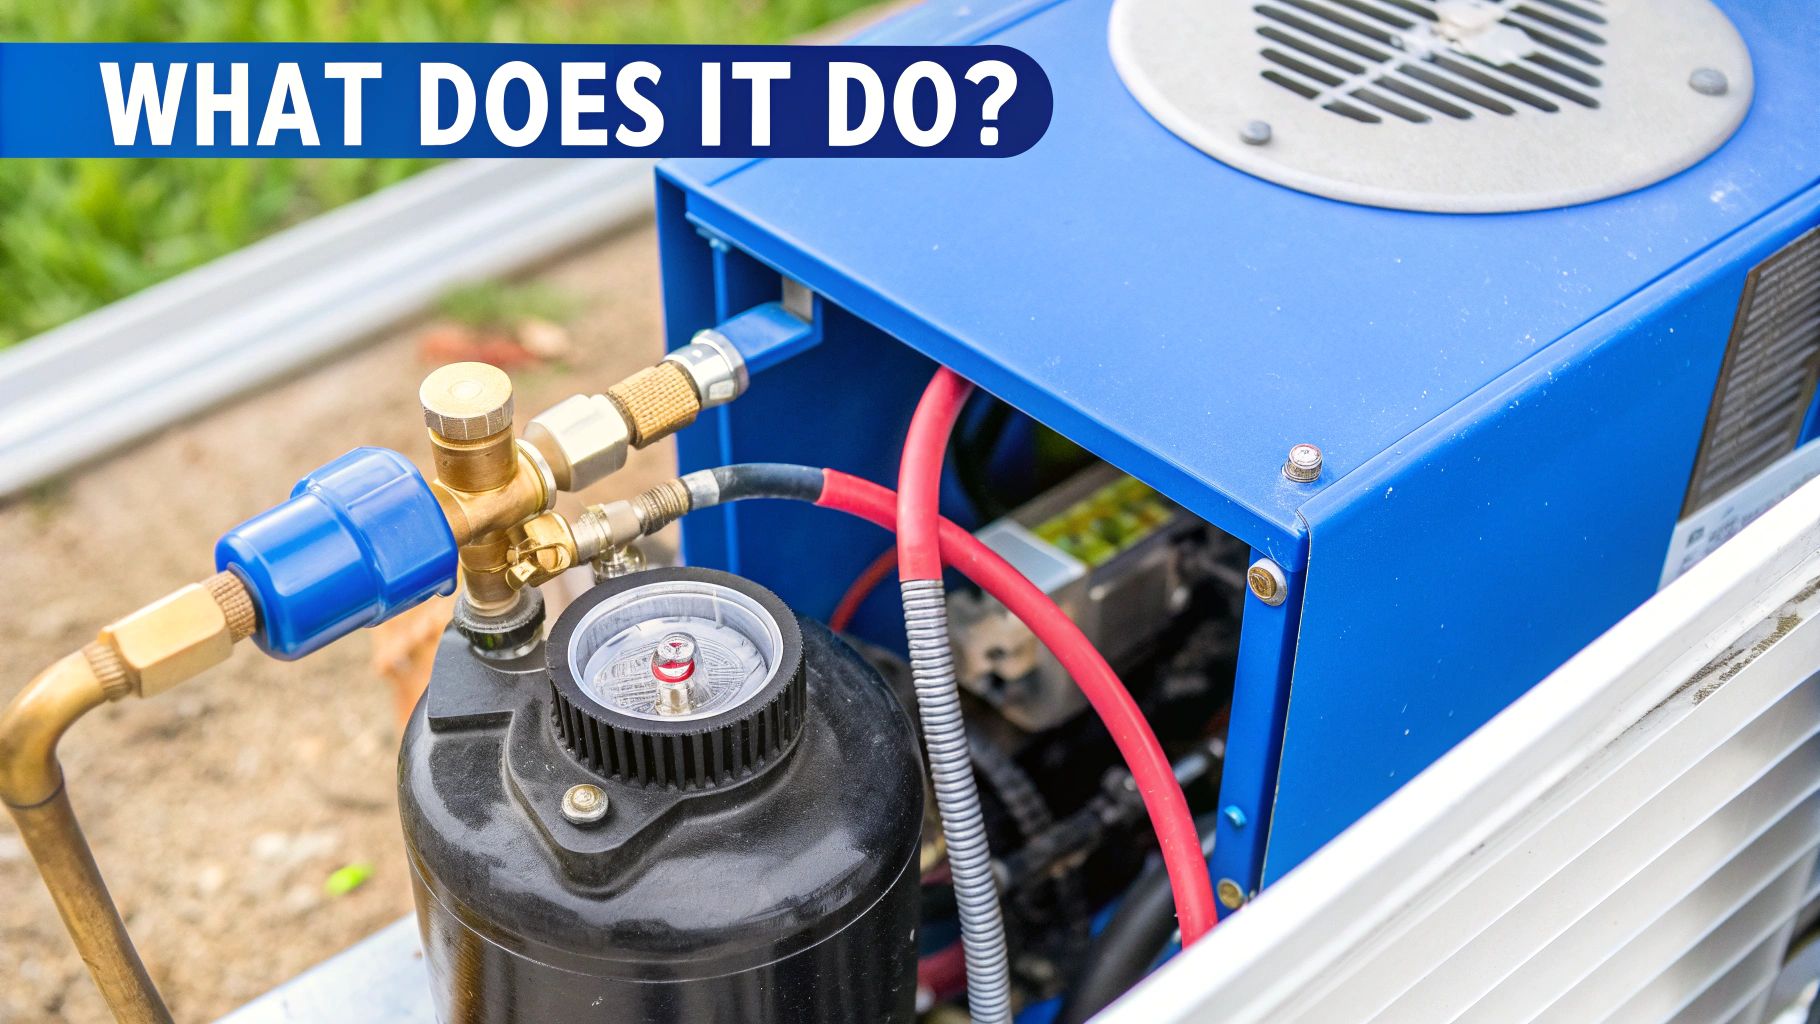
When you're out on a job, it’s easy to focus on the big-ticket items like compressors and coils. But there's a small, often overlooked part that acts as the essential guardian for your most expensive recovery equipment: the recovery machine filter drier.
Think of it as the kidney for your recovery unit. Its whole job is to catch all the nasty stuff—moisture, acid, and solid gunk—before it has a chance to get inside and wreak havoc. It ensures only clean refrigerant circulates, protecting the delicate and expensive internal components from a catastrophic (and costly) failure.
The Unsung Hero of Refrigerant Recovery
Let’s be honest, the filter drier isn't the star of the show. It's a humble component, but its role is absolutely critical. Its main purpose isn't really to clean up the system's refrigerant so you can dump it back in; it's to protect your recovery machine.
By trapping contaminants before they ever hit your equipment, this little canister prevents the kind of internal damage that leads to expensive repairs and frustrating downtime. It's a cheap piece of insurance that pays for itself over and over again.
Why Its Role is Non-Negotiable
A clean recovery process is just part of being a pro. The filter drier makes sure that the refrigerant you pull from a system is free from harmful particles and moisture that would otherwise chew up your recovery unit's compressor and seals. This becomes especially vital when you're dealing with a system that has suffered a burnout—those are chock-full of highly corrosive acids and sludge.
A filter drier is your first line of defense. Skipping it is like performing surgery without sterilizing your tools—it introduces unacceptable risk to your most valuable equipment.
The need for these parts is only growing as the HVAC industry expands. With global temperatures on the rise, the demand for air conditioning is surging—A/C already makes up about 12% of residential energy use in the U.S. This just highlights how important it is to have efficient, well-maintained systems, and the filter drier is a key piece of that puzzle. You can find more insights about the filter drier market on Verified Market Reports.
At the end of the day, slapping a fresh recovery machine filter drier on for every job is a sign of a true professional. It shows you care about your tools and your work, ensuring:
Equipment Protection: It stops debris and moisture from causing premature wear and tear on your recovery machine.
Operational Efficiency: A clean, unclogged filter keeps flow rates where they should be, making the recovery process much faster.
Environmental Compliance: It helps ensure the refrigerant you recover is pure enough to be recycled, which is crucial for meeting responsible service standards.
How a Filter Drier Actually Works
So, how does this little canister actually protect your expensive recovery machine? To really get it, we have to look inside and see how it pulls off its two main jobs: grabbing solid gunk and pulling out moisture. It’s basically a two-stage security guard for your refrigerant.
First up is the filtering part. Picture a super-fine net stretched across the inside of the canister. This net, usually made from materials like polyester or fiberglass, is designed to physically block solid particles. We're talking about tiny metal shavings from a worn-out compressor, sludge from burnt oil, or even bits of dirt that got in during a previous repair.
Without that net, all that junk would just circulate through your recovery unit, sandblasting its internal parts and causing some serious, expensive damage.
The Magic of Adsorption
The second job—drying the refrigerant—is where things get a bit more clever. This isn't about a physical screen; it’s a chemical process called adsorption. Inside every filter drier, you'll find a special material called a desiccant. Most of the time, this is a "molecular sieve."
Think of this desiccant like a sponge, but a highly specialized one. Its surface is covered with billions of microscopic pores, all perfectly sized to grab onto water molecules and nothing else. As damp refrigerant flows over these little beads, the water molecules get pulled out of the stream and stick tightly to the desiccant's surface. The refrigerant itself just passes right on through.
This is absolutely critical because moisture is public enemy number one in any refrigeration system. When water mixes with refrigerant and oil, it creates nasty corrosive acids that will literally eat away at compressor windings and metal components from the inside.
Here's the key: The desiccant is designed to only trap water. The refrigerant molecules are much larger and simply flow past, completely unaffected. This means the filter drier purifies the refrigerant without changing its fundamental properties.
Filtration and Drying, Working Together
The real genius of a recovery machine filter drier is how it packs both of these functions into one small, efficient package. Here’s a play-by-play of what happens inside:
Inlet: The contaminated, wet refrigerant enters the filter drier.
Filtration: It immediately hits the filter pad, which snags all the solid debris.
Drying: Now free of particles, the refrigerant flows through the bed of desiccant beads, where any moisture gets stripped out.
Outlet: Clean, dry refrigerant exits the drier, safe to enter your recovery machine.
By doing both jobs at once, the filter drier acts as the ultimate gatekeeper, making sure only pure refrigerant gets anywhere near the heart of your recovery unit. This simple but powerful device is why it's considered essential, especially when you're cleaning up a system after a nasty burnout. It's cheap insurance for a very expensive piece of equipment.
Choosing the Right Filter Drier for Your Machine
Picking the right recovery machine filter drier isn't just a minor detail—it's one of the most important decisions you'll make on a job. Get it right, and you protect your expensive recovery unit and ensure a clean, efficient job. Get it wrong, and you could be looking at restricted refrigerant flow, leftover contaminants, and even a damaged machine.
Think of it like choosing the right oil filter for a car. You wouldn't put a standard filter on a high-performance engine, would you? That engine needs a filter built for higher pressures and finer filtration. It's the same principle in HVAC. A system that just went through a nasty compressor burnout needs a completely different kind of filter drier than one getting a simple, routine check-up.
Making this call is a core skill for any good technician. This flowchart breaks down the basic thinking process when you suspect a filter drier might be clogged or saturated.
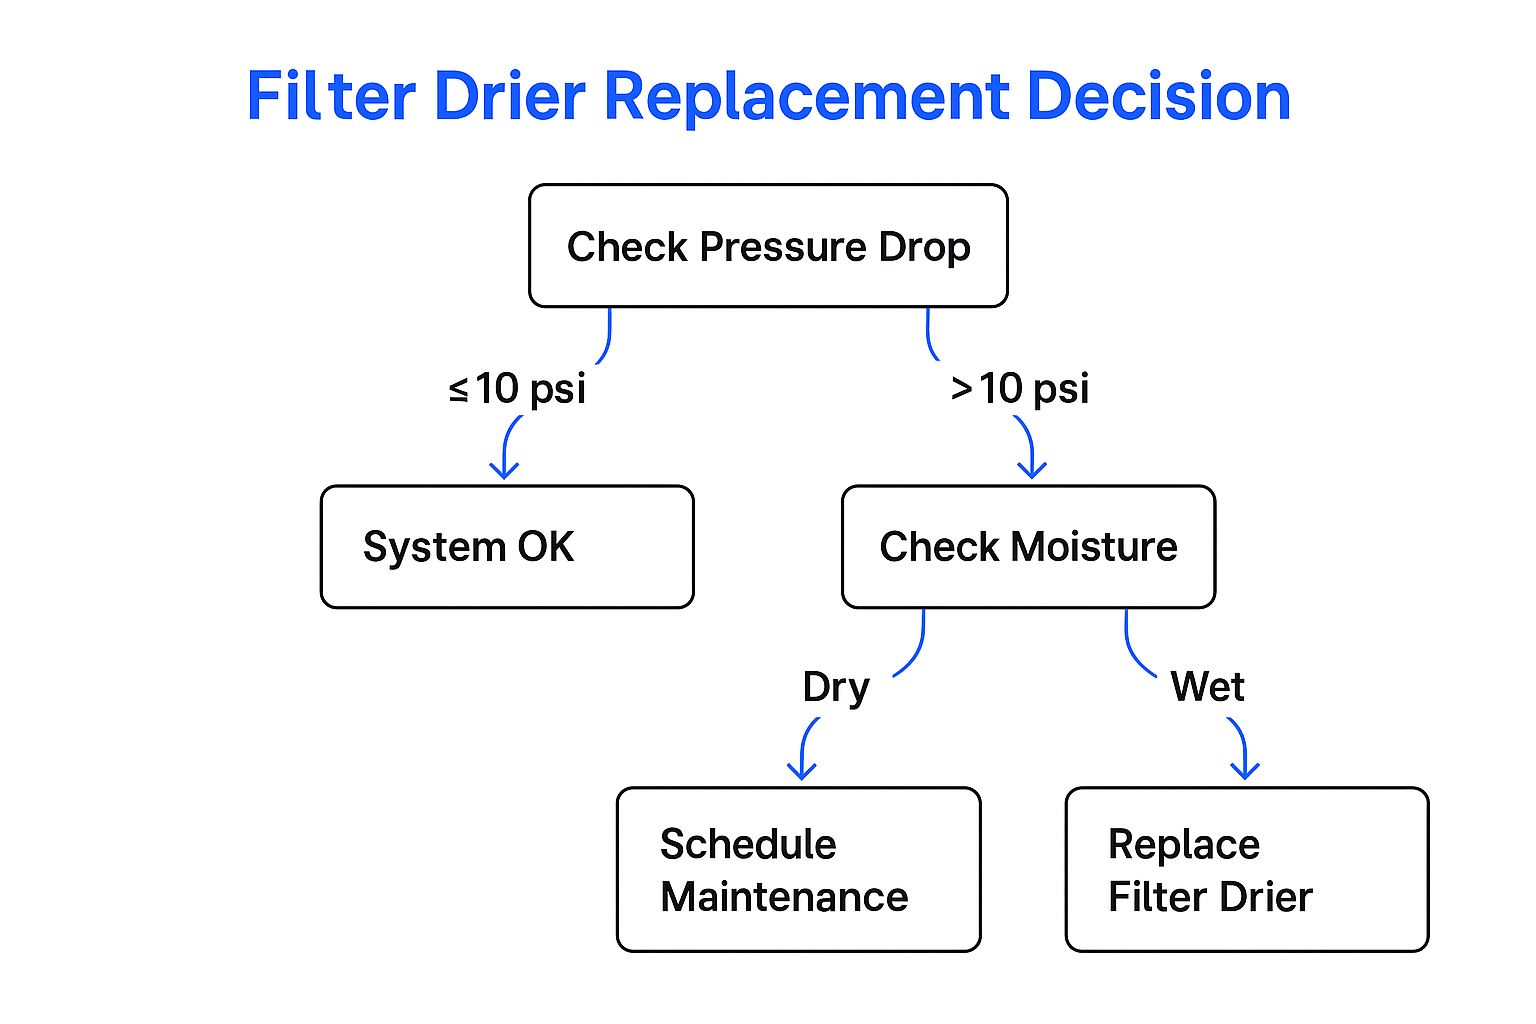
As you can see, a significant pressure drop across the drier is your first big clue. It’s the red flag telling you to dig deeper and check for moisture, which will ultimately determine your next move.
Matching the Drier to the Job
So, how do you make sure you’re grabbing the right part from the truck? A few key factors will always guide your decision: the system's capacity (tonnage), the specific type of refrigerant in the lines, and, of course, the physical size of the connections.
For instance, working on newer systems with HFO refrigerants means you need a drier with desiccant materials specifically designed to handle them. An older-style drier just won't cut it and could even break down. The growing importance of this single component is pretty clear when you look at the numbers. The global market for one-way filter driers was valued at USD 1.5 billion in 2023 and is expected to climb to USD 2.9 billion by 2032, all because of the demand for better recovery technology. You can find more details on this trend in a market report from Dataintelo.
To make it even simpler, here's a quick look at common scenarios every technician faces:
Filter Drier Selection Guide
Here’s a quick-reference table to help you match the right filter drier to the job at hand. Think of it as a cheat sheet for the most common service calls.
Scenario | Recommended Filter Drier Type | Key Feature | Best For |
|---|---|---|---|
Routine Maintenance | Standard Liquid Line Drier | Balanced moisture & particle removal | Clean, operational systems during a standard PM or component swap. |
System Burnout | High-Capacity Suction Line Burnout Drier | High acid & sludge capacity | Post-compressor failure to clean up acidic oil and carbon. |
Known High Moisture | High Water Capacity Liquid Line Drier | Desiccant with extra moisture-holding ability | Systems left open to the atmosphere or with a "wet" sight glass. |
New System Installation | OEM-Specified Liquid Line Drier | Meets manufacturer's exact specs | Ensuring warranty compliance and optimal day-one performance. |
This table should help you quickly diagnose the situation and grab the correct part with confidence, knowing you're prepared for whatever the system throws at you.
Sealed vs. Replaceable Core Models
One last thing to consider is the style of the drier itself. You'll run into two main types: sealed models and those with a replaceable core.
Sealed filter driers are exactly what they sound like—compact, single-use units that you toss out after they've done their job. They are perfect for most residential and light commercial systems, where service calls are less frequent and swapping out the whole component is quick and easy.
On the other hand, replaceable core driers are built for the big leagues. They have a permanent outer shell that stays brazed into the line, and you just swap out the filter core inside. You’ll find these on larger commercial and industrial equipment. This design is a real time-saver, letting technicians change the filter media without having to break out the torches every time.
Proper Installation and Replacement Procedures

You can have the best recovery machine filter drier money can buy, but if it's not installed right, it's practically worthless. A proper installation is everything when it comes to protecting your gear and getting the job done efficiently. Even small slip-ups here can cause major headaches down the road, from restricted refrigerant flow to contaminants sneaking right past the filter.
The single most common mistake I see in the field is also the most frustrating: installing the drier backward. Every filter drier has a big, obvious arrow stamped right on the shell. That arrow must point in the direction of refrigerant flow—away from the system and toward your recovery machine. Get this wrong, and you'll choke the recovery process and could even wreck your equipment.
The Replacement Rule You Should Never Break
Let's get one thing straight. The filter drier gets replaced on every single major service call. No exceptions. This isn't a "maybe" or a "sometimes" thing. Reusing an old filter drier is like putting a dirty, clogged filter back on your truck after an oil change. It just doesn't make sense.
Think about it: that old filter is already saturated with all the junk and moisture it pulled from the last job. Slapping it back on the line is a surefire way to inject that same garbage into the next system you work on, or worse, straight into your expensive recovery unit.
Treat your filter drier like a single-use safety tool. Its whole purpose is to trap nasty stuff. Once it's done its job, it's full. A fresh drier for every job is the cheapest insurance you can buy for your recovery machine.
Key Installation Steps for Success
Getting the installation right involves more than just pointing the arrow in the right direction. If you want a solid, leak-free seal that protects the drier itself, you need a consistent process.
Here’s a quick rundown for a perfect installation every time:
Verify Flow Direction: Before you do anything else, double-check that arrow. Make sure it’s pointing along the path the refrigerant will travel toward your recovery machine.
Use Proper Brazing Techniques: When you're brazing the drier in, always wrap the shell with a wet rag. This simple trick keeps it from overheating, which can bake the desiccant material inside and ruin its ability to absorb moisture.
Conduct a Thorough Leak Test: Once your connections are cool, perform a nitrogen pressure test. Get out your soap bubbles or an electronic leak detector and confirm you have a perfect seal on both joints. Don't skip this.
Always Evacuate Hoses: Before you kick on the recovery machine, pull a deep vacuum on your hoses. This gets rid of any air and other non-condensables, ensuring the refrigerant you pull out stays pure.
Making these steps a habit will turn a simple filter change into a powerful line of defense for your most valuable tools.
Spotting the Signs of a Failing Filter Drier
A failing recovery machine filter drier doesn't usually die a sudden death. It sends out distress signals long before it gives up completely. Learning to read these signs is what separates a good technician from a great one—it's the difference between reacting to a breakdown and preventing one in the first place.
Think of it like this: if the refrigerant is the lifeblood of the system, the filter drier is the kidney. When it gets clogged with gunk or saturated with moisture, it can't do its job. This creates a bottleneck that slows down the entire recovery process, adds unnecessary strain to your equipment, and ultimately risks a much bigger, more expensive failure down the road.
Key Diagnostic Indicators
You don't need a truck full of fancy tools to spot a failing drier. Your most powerful diagnostic instruments are often just a set of gauges and your own sense of touch. These simple checks can tell you almost everything you need to know about what's happening inside that little cylinder.
A brand-new filter drier should let refrigerant pass through with almost no resistance. But as it fills up with contaminants, it starts to choke off the flow. This restriction creates a very obvious pressure differential between the inlet and outlet.
A telltale sign of a clogged filter is a significant pressure drop across the drier itself. If you're seeing a difference of more than 2-3 PSID (pounds per square inch differential) between the inlet and outlet under a normal load, you've found your culprit. That filter is plugged up and needs to go.
This blockage also produces a symptom you can literally feel with your hand. As the refrigerant is forced through the restricted filter, it experiences a slight expansion, which causes a drop in temperature—the same principle that makes an AC system work. You'll often feel a noticeable temperature difference from one side of the drier to the other; the outlet side will feel colder than the inlet.
Visual Clues and System Performance
Beyond pressure and temperature, just using your eyes can reveal a lot, especially if the system has a sight glass. A sight glass is your window into the health of the refrigerant circuit.
Bubbles in the Sight Glass: Seeing bubbles flash in the sight glass after the drier often means you have a pressure drop. This points a finger directly at a restricted filter.
Moisture Indicator Color Change: Most sight glasses have a built-in moisture indicator. If that little dot has changed color, it’s screaming that the desiccant is saturated and the drier is no longer protecting the system from water.
Slow Recovery Speeds: Is a recovery job dragging on forever? A clogged filter drier is one of the most common reasons. The machine is essentially trying to suck a thick milkshake through a tiny straw.
The demand for high-quality filtration is only growing. The market for filtration and drying equipment hit USD 1.39 billion in 2023 and is on an upward trend. You can see detailed projections on this industrial equipment market from Grand View Research. By catching these early warning signs, you're not just swapping a part; you're preventing catastrophic compressor failure and saving everyone a ton of time, money, and frustration.
The True Impact on System Efficiency and Longevity

A recovery machine filter drier isn't just about protecting your expensive tools—it’s about safeguarding the health and performance of every HVAC system you touch. Think about it: the moment you hook up your recovery rig, you’ve created a direct bridge between your equipment and the customer's system. That filter drier is the gatekeeper standing guard on that bridge.
By making sure only clean, dry refrigerant makes it into your recovery unit, you stop cross-contamination in its tracks. This one simple component prevents you from accidentally introducing gunk from a previous burnout job into a perfectly healthy system, protecting the refrigerant's integrity and the customer's equipment.
Boosting Efficiency and Lowering Costs
A clean recovery process is a fast and efficient one. Ever tried to pull a recovery on a system with a clogged filter drier? You know the machine has to work overtime, straining the compressor, drawing more power, and dragging out the job. A fresh filter drier keeps the flow wide open, letting your equipment work the way it was designed to.
This efficiency means you're using less power and spending less time on site—a win for your bottom line. But the real payoff is for your clients. A system serviced using clean, professional methods simply runs better, uses less energy, and leads to lower utility bills down the road.
A properly maintained system, safeguarded by components like a quality filter drier, can operate up to 15% more efficiently than a neglected one. For property owners, those are real, tangible savings that add up over the life of their equipment.
Extending Equipment Lifespan
The biggest benefit, without a doubt, is how it extends the life of the equipment. We all know the compressor is the heart of any refrigeration system and the most expensive part to replace. That filter drier is your first and best line of defense against the acidic sludge, moisture, and debris that cause catastrophic compressor failure.
This proactive protection extends well beyond the compressor, shielding metering devices and other sensitive components from damage. For your customers, this translates to fewer surprise breakdowns, lower repair bills, and a much better return on their significant HVAC investment.
On top of all that, a clean recovery process is just good practice. Using a quality filter drier ensures the refrigerant you pull is pure enough for recycling, helping you stay compliant with regulations. It also reinforces your reputation as a true professional who cares about doing the job right—for the equipment, the customer, and the environment.
Common Questions About Filter Driers
Even the sharpest techs have questions about filter driers out in the field. Let's walk through some of the most frequent ones I hear, because getting these right protects your gear and makes every job go smoother.
These aren't just random questions; they come up all the time. Nailing the answers is what separates a quick, clean recovery from a costly headache.
How Often Should I Change the Filter Drier?
This is probably the number one question, and the answer is non-negotiable: change the filter drier after every single job. No exceptions.
Think of it as a one-and-done piece of equipment. Its job is to catch all the gunk from a system. Once it’s done that, it's full. Reusing it is like trying to clean a window with a muddy rag—you’re just smearing the last job’s problems all over the next one. This is especially true after a nasty compressor burnout. That filter is now loaded with acid and sludge, and putting it on another system is a guaranteed way to cause cross-contamination.
A fresh filter drier for every recovery is the best insurance you can buy for your thousand-dollar recovery machine. It’s a small price to pay to protect a major investment.
Can I Use Any Filter Drier with Any Refrigerant?
Definitely not. This is where paying attention to the details really matters. The material inside the filter—the desiccant that grabs the moisture—is specifically designed to work with certain refrigerants and their oils. Grabbing the wrong one can cause real trouble.
For instance:
Reactions: Some desiccants can have a bad reaction with certain refrigerants or oils, causing the desiccant itself to break down and release gunk back into the system.
Useless for Moisture: An incompatible desiccant might not absorb moisture effectively from that specific type of refrigerant, basically leaving the system vulnerable.
Always, always check the manufacturer’s label on the filter. Make sure it's rated for the gas you're working with, whether it’s an old-school CFC, a common HFC like R-410A, or one of the newer HFOs.
What Happens If I Install a Filter Drier Backwards?
Putting a filter drier in backwards is an easy mistake to make, but it’s a costly one. Every filter has an arrow stamped right on the shell. That arrow must point in the direction the refrigerant is flowing—out of the system you’re servicing and into your recovery machine.
If you get it backwards, the whole internal setup of the filter gets blown out. The pressure will pop the filter pad right off its support, creating a mess of problems almost instantly:
Flow Grinds to a Halt: Your recovery will slow to a crawl, putting a massive strain on your machine's compressor.
No More Filtering: With the pad dislodged, debris just flows right around it. The filter is now useless, and you’re pumping contaminants directly into your recovery unit.
Machine Damage: That kind of back pressure can wreck your recovery machine’s compressor and other components. It takes two seconds to double-check the arrow before you fire up the torch—make it a habit.
When you're out on a job, it’s easy to focus on the big-ticket items like compressors and coils. But there's a small, often overlooked part that acts as the essential guardian for your most expensive recovery equipment: the recovery machine filter drier.
Think of it as the kidney for your recovery unit. Its whole job is to catch all the nasty stuff—moisture, acid, and solid gunk—before it has a chance to get inside and wreak havoc. It ensures only clean refrigerant circulates, protecting the delicate and expensive internal components from a catastrophic (and costly) failure.
The Unsung Hero of Refrigerant Recovery
Let’s be honest, the filter drier isn't the star of the show. It's a humble component, but its role is absolutely critical. Its main purpose isn't really to clean up the system's refrigerant so you can dump it back in; it's to protect your recovery machine.
By trapping contaminants before they ever hit your equipment, this little canister prevents the kind of internal damage that leads to expensive repairs and frustrating downtime. It's a cheap piece of insurance that pays for itself over and over again.
Why Its Role is Non-Negotiable
A clean recovery process is just part of being a pro. The filter drier makes sure that the refrigerant you pull from a system is free from harmful particles and moisture that would otherwise chew up your recovery unit's compressor and seals. This becomes especially vital when you're dealing with a system that has suffered a burnout—those are chock-full of highly corrosive acids and sludge.
A filter drier is your first line of defense. Skipping it is like performing surgery without sterilizing your tools—it introduces unacceptable risk to your most valuable equipment.
The need for these parts is only growing as the HVAC industry expands. With global temperatures on the rise, the demand for air conditioning is surging—A/C already makes up about 12% of residential energy use in the U.S. This just highlights how important it is to have efficient, well-maintained systems, and the filter drier is a key piece of that puzzle. You can find more insights about the filter drier market on Verified Market Reports.
At the end of the day, slapping a fresh recovery machine filter drier on for every job is a sign of a true professional. It shows you care about your tools and your work, ensuring:
Equipment Protection: It stops debris and moisture from causing premature wear and tear on your recovery machine.
Operational Efficiency: A clean, unclogged filter keeps flow rates where they should be, making the recovery process much faster.
Environmental Compliance: It helps ensure the refrigerant you recover is pure enough to be recycled, which is crucial for meeting responsible service standards.
How a Filter Drier Actually Works
So, how does this little canister actually protect your expensive recovery machine? To really get it, we have to look inside and see how it pulls off its two main jobs: grabbing solid gunk and pulling out moisture. It’s basically a two-stage security guard for your refrigerant.
First up is the filtering part. Picture a super-fine net stretched across the inside of the canister. This net, usually made from materials like polyester or fiberglass, is designed to physically block solid particles. We're talking about tiny metal shavings from a worn-out compressor, sludge from burnt oil, or even bits of dirt that got in during a previous repair.
Without that net, all that junk would just circulate through your recovery unit, sandblasting its internal parts and causing some serious, expensive damage.
The Magic of Adsorption
The second job—drying the refrigerant—is where things get a bit more clever. This isn't about a physical screen; it’s a chemical process called adsorption. Inside every filter drier, you'll find a special material called a desiccant. Most of the time, this is a "molecular sieve."
Think of this desiccant like a sponge, but a highly specialized one. Its surface is covered with billions of microscopic pores, all perfectly sized to grab onto water molecules and nothing else. As damp refrigerant flows over these little beads, the water molecules get pulled out of the stream and stick tightly to the desiccant's surface. The refrigerant itself just passes right on through.
This is absolutely critical because moisture is public enemy number one in any refrigeration system. When water mixes with refrigerant and oil, it creates nasty corrosive acids that will literally eat away at compressor windings and metal components from the inside.
Here's the key: The desiccant is designed to only trap water. The refrigerant molecules are much larger and simply flow past, completely unaffected. This means the filter drier purifies the refrigerant without changing its fundamental properties.
Filtration and Drying, Working Together
The real genius of a recovery machine filter drier is how it packs both of these functions into one small, efficient package. Here’s a play-by-play of what happens inside:
Inlet: The contaminated, wet refrigerant enters the filter drier.
Filtration: It immediately hits the filter pad, which snags all the solid debris.
Drying: Now free of particles, the refrigerant flows through the bed of desiccant beads, where any moisture gets stripped out.
Outlet: Clean, dry refrigerant exits the drier, safe to enter your recovery machine.
By doing both jobs at once, the filter drier acts as the ultimate gatekeeper, making sure only pure refrigerant gets anywhere near the heart of your recovery unit. This simple but powerful device is why it's considered essential, especially when you're cleaning up a system after a nasty burnout. It's cheap insurance for a very expensive piece of equipment.
Choosing the Right Filter Drier for Your Machine
Picking the right recovery machine filter drier isn't just a minor detail—it's one of the most important decisions you'll make on a job. Get it right, and you protect your expensive recovery unit and ensure a clean, efficient job. Get it wrong, and you could be looking at restricted refrigerant flow, leftover contaminants, and even a damaged machine.
Think of it like choosing the right oil filter for a car. You wouldn't put a standard filter on a high-performance engine, would you? That engine needs a filter built for higher pressures and finer filtration. It's the same principle in HVAC. A system that just went through a nasty compressor burnout needs a completely different kind of filter drier than one getting a simple, routine check-up.
Making this call is a core skill for any good technician. This flowchart breaks down the basic thinking process when you suspect a filter drier might be clogged or saturated.
As you can see, a significant pressure drop across the drier is your first big clue. It’s the red flag telling you to dig deeper and check for moisture, which will ultimately determine your next move.
Matching the Drier to the Job
So, how do you make sure you’re grabbing the right part from the truck? A few key factors will always guide your decision: the system's capacity (tonnage), the specific type of refrigerant in the lines, and, of course, the physical size of the connections.
For instance, working on newer systems with HFO refrigerants means you need a drier with desiccant materials specifically designed to handle them. An older-style drier just won't cut it and could even break down. The growing importance of this single component is pretty clear when you look at the numbers. The global market for one-way filter driers was valued at USD 1.5 billion in 2023 and is expected to climb to USD 2.9 billion by 2032, all because of the demand for better recovery technology. You can find more details on this trend in a market report from Dataintelo.
To make it even simpler, here's a quick look at common scenarios every technician faces:
Filter Drier Selection Guide
Here’s a quick-reference table to help you match the right filter drier to the job at hand. Think of it as a cheat sheet for the most common service calls.
Scenario | Recommended Filter Drier Type | Key Feature | Best For |
|---|---|---|---|
Routine Maintenance | Standard Liquid Line Drier | Balanced moisture & particle removal | Clean, operational systems during a standard PM or component swap. |
System Burnout | High-Capacity Suction Line Burnout Drier | High acid & sludge capacity | Post-compressor failure to clean up acidic oil and carbon. |
Known High Moisture | High Water Capacity Liquid Line Drier | Desiccant with extra moisture-holding ability | Systems left open to the atmosphere or with a "wet" sight glass. |
New System Installation | OEM-Specified Liquid Line Drier | Meets manufacturer's exact specs | Ensuring warranty compliance and optimal day-one performance. |
This table should help you quickly diagnose the situation and grab the correct part with confidence, knowing you're prepared for whatever the system throws at you.
Sealed vs. Replaceable Core Models
One last thing to consider is the style of the drier itself. You'll run into two main types: sealed models and those with a replaceable core.
Sealed filter driers are exactly what they sound like—compact, single-use units that you toss out after they've done their job. They are perfect for most residential and light commercial systems, where service calls are less frequent and swapping out the whole component is quick and easy.
On the other hand, replaceable core driers are built for the big leagues. They have a permanent outer shell that stays brazed into the line, and you just swap out the filter core inside. You’ll find these on larger commercial and industrial equipment. This design is a real time-saver, letting technicians change the filter media without having to break out the torches every time.
Proper Installation and Replacement Procedures
You can have the best recovery machine filter drier money can buy, but if it's not installed right, it's practically worthless. A proper installation is everything when it comes to protecting your gear and getting the job done efficiently. Even small slip-ups here can cause major headaches down the road, from restricted refrigerant flow to contaminants sneaking right past the filter.
The single most common mistake I see in the field is also the most frustrating: installing the drier backward. Every filter drier has a big, obvious arrow stamped right on the shell. That arrow must point in the direction of refrigerant flow—away from the system and toward your recovery machine. Get this wrong, and you'll choke the recovery process and could even wreck your equipment.
The Replacement Rule You Should Never Break
Let's get one thing straight. The filter drier gets replaced on every single major service call. No exceptions. This isn't a "maybe" or a "sometimes" thing. Reusing an old filter drier is like putting a dirty, clogged filter back on your truck after an oil change. It just doesn't make sense.
Think about it: that old filter is already saturated with all the junk and moisture it pulled from the last job. Slapping it back on the line is a surefire way to inject that same garbage into the next system you work on, or worse, straight into your expensive recovery unit.
Treat your filter drier like a single-use safety tool. Its whole purpose is to trap nasty stuff. Once it's done its job, it's full. A fresh drier for every job is the cheapest insurance you can buy for your recovery machine.
Key Installation Steps for Success
Getting the installation right involves more than just pointing the arrow in the right direction. If you want a solid, leak-free seal that protects the drier itself, you need a consistent process.
Here’s a quick rundown for a perfect installation every time:
Verify Flow Direction: Before you do anything else, double-check that arrow. Make sure it’s pointing along the path the refrigerant will travel toward your recovery machine.
Use Proper Brazing Techniques: When you're brazing the drier in, always wrap the shell with a wet rag. This simple trick keeps it from overheating, which can bake the desiccant material inside and ruin its ability to absorb moisture.
Conduct a Thorough Leak Test: Once your connections are cool, perform a nitrogen pressure test. Get out your soap bubbles or an electronic leak detector and confirm you have a perfect seal on both joints. Don't skip this.
Always Evacuate Hoses: Before you kick on the recovery machine, pull a deep vacuum on your hoses. This gets rid of any air and other non-condensables, ensuring the refrigerant you pull out stays pure.
Making these steps a habit will turn a simple filter change into a powerful line of defense for your most valuable tools.
Spotting the Signs of a Failing Filter Drier
A failing recovery machine filter drier doesn't usually die a sudden death. It sends out distress signals long before it gives up completely. Learning to read these signs is what separates a good technician from a great one—it's the difference between reacting to a breakdown and preventing one in the first place.
Think of it like this: if the refrigerant is the lifeblood of the system, the filter drier is the kidney. When it gets clogged with gunk or saturated with moisture, it can't do its job. This creates a bottleneck that slows down the entire recovery process, adds unnecessary strain to your equipment, and ultimately risks a much bigger, more expensive failure down the road.
Key Diagnostic Indicators
You don't need a truck full of fancy tools to spot a failing drier. Your most powerful diagnostic instruments are often just a set of gauges and your own sense of touch. These simple checks can tell you almost everything you need to know about what's happening inside that little cylinder.
A brand-new filter drier should let refrigerant pass through with almost no resistance. But as it fills up with contaminants, it starts to choke off the flow. This restriction creates a very obvious pressure differential between the inlet and outlet.
A telltale sign of a clogged filter is a significant pressure drop across the drier itself. If you're seeing a difference of more than 2-3 PSID (pounds per square inch differential) between the inlet and outlet under a normal load, you've found your culprit. That filter is plugged up and needs to go.
This blockage also produces a symptom you can literally feel with your hand. As the refrigerant is forced through the restricted filter, it experiences a slight expansion, which causes a drop in temperature—the same principle that makes an AC system work. You'll often feel a noticeable temperature difference from one side of the drier to the other; the outlet side will feel colder than the inlet.
Visual Clues and System Performance
Beyond pressure and temperature, just using your eyes can reveal a lot, especially if the system has a sight glass. A sight glass is your window into the health of the refrigerant circuit.
Bubbles in the Sight Glass: Seeing bubbles flash in the sight glass after the drier often means you have a pressure drop. This points a finger directly at a restricted filter.
Moisture Indicator Color Change: Most sight glasses have a built-in moisture indicator. If that little dot has changed color, it’s screaming that the desiccant is saturated and the drier is no longer protecting the system from water.
Slow Recovery Speeds: Is a recovery job dragging on forever? A clogged filter drier is one of the most common reasons. The machine is essentially trying to suck a thick milkshake through a tiny straw.
The demand for high-quality filtration is only growing. The market for filtration and drying equipment hit USD 1.39 billion in 2023 and is on an upward trend. You can see detailed projections on this industrial equipment market from Grand View Research. By catching these early warning signs, you're not just swapping a part; you're preventing catastrophic compressor failure and saving everyone a ton of time, money, and frustration.
The True Impact on System Efficiency and Longevity
A recovery machine filter drier isn't just about protecting your expensive tools—it’s about safeguarding the health and performance of every HVAC system you touch. Think about it: the moment you hook up your recovery rig, you’ve created a direct bridge between your equipment and the customer's system. That filter drier is the gatekeeper standing guard on that bridge.
By making sure only clean, dry refrigerant makes it into your recovery unit, you stop cross-contamination in its tracks. This one simple component prevents you from accidentally introducing gunk from a previous burnout job into a perfectly healthy system, protecting the refrigerant's integrity and the customer's equipment.
Boosting Efficiency and Lowering Costs
A clean recovery process is a fast and efficient one. Ever tried to pull a recovery on a system with a clogged filter drier? You know the machine has to work overtime, straining the compressor, drawing more power, and dragging out the job. A fresh filter drier keeps the flow wide open, letting your equipment work the way it was designed to.
This efficiency means you're using less power and spending less time on site—a win for your bottom line. But the real payoff is for your clients. A system serviced using clean, professional methods simply runs better, uses less energy, and leads to lower utility bills down the road.
A properly maintained system, safeguarded by components like a quality filter drier, can operate up to 15% more efficiently than a neglected one. For property owners, those are real, tangible savings that add up over the life of their equipment.
Extending Equipment Lifespan
The biggest benefit, without a doubt, is how it extends the life of the equipment. We all know the compressor is the heart of any refrigeration system and the most expensive part to replace. That filter drier is your first and best line of defense against the acidic sludge, moisture, and debris that cause catastrophic compressor failure.
This proactive protection extends well beyond the compressor, shielding metering devices and other sensitive components from damage. For your customers, this translates to fewer surprise breakdowns, lower repair bills, and a much better return on their significant HVAC investment.
On top of all that, a clean recovery process is just good practice. Using a quality filter drier ensures the refrigerant you pull is pure enough for recycling, helping you stay compliant with regulations. It also reinforces your reputation as a true professional who cares about doing the job right—for the equipment, the customer, and the environment.
Common Questions About Filter Driers
Even the sharpest techs have questions about filter driers out in the field. Let's walk through some of the most frequent ones I hear, because getting these right protects your gear and makes every job go smoother.
These aren't just random questions; they come up all the time. Nailing the answers is what separates a quick, clean recovery from a costly headache.
How Often Should I Change the Filter Drier?
This is probably the number one question, and the answer is non-negotiable: change the filter drier after every single job. No exceptions.
Think of it as a one-and-done piece of equipment. Its job is to catch all the gunk from a system. Once it’s done that, it's full. Reusing it is like trying to clean a window with a muddy rag—you’re just smearing the last job’s problems all over the next one. This is especially true after a nasty compressor burnout. That filter is now loaded with acid and sludge, and putting it on another system is a guaranteed way to cause cross-contamination.
A fresh filter drier for every recovery is the best insurance you can buy for your thousand-dollar recovery machine. It’s a small price to pay to protect a major investment.
Can I Use Any Filter Drier with Any Refrigerant?
Definitely not. This is where paying attention to the details really matters. The material inside the filter—the desiccant that grabs the moisture—is specifically designed to work with certain refrigerants and their oils. Grabbing the wrong one can cause real trouble.
For instance:
Reactions: Some desiccants can have a bad reaction with certain refrigerants or oils, causing the desiccant itself to break down and release gunk back into the system.
Useless for Moisture: An incompatible desiccant might not absorb moisture effectively from that specific type of refrigerant, basically leaving the system vulnerable.
Always, always check the manufacturer’s label on the filter. Make sure it's rated for the gas you're working with, whether it’s an old-school CFC, a common HFC like R-410A, or one of the newer HFOs.
What Happens If I Install a Filter Drier Backwards?
Putting a filter drier in backwards is an easy mistake to make, but it’s a costly one. Every filter has an arrow stamped right on the shell. That arrow must point in the direction the refrigerant is flowing—out of the system you’re servicing and into your recovery machine.
If you get it backwards, the whole internal setup of the filter gets blown out. The pressure will pop the filter pad right off its support, creating a mess of problems almost instantly:
Flow Grinds to a Halt: Your recovery will slow to a crawl, putting a massive strain on your machine's compressor.
No More Filtering: With the pad dislodged, debris just flows right around it. The filter is now useless, and you’re pumping contaminants directly into your recovery unit.
Machine Damage: That kind of back pressure can wreck your recovery machine’s compressor and other components. It takes two seconds to double-check the arrow before you fire up the torch—make it a habit.
Keep Reading
Related Articles

What is a VFD in HVAC? A Practical Explainer
What is a VFD in HVAC? A Practical Explainer
What is a VFD in HVAC? Learn how Variable Frequency Drives work, their key benefits for energy savings, and their most common applications in modern buildings.
Aug 7, 2025
Aug 7, 2025

Your Guide to Refrigerant Pressure Temp Charts
Your Guide to Refrigerant Pressure Temp Charts
Master the refrigerant pressure temp chart. This guide explains how to read and use PT charts for system diagnosis, charging, and ensuring HVAC efficiency.
Aug 8, 2025
Aug 8, 2025

How to Read HVAC Wiring Diagrams: A Complete Guide
How to Read HVAC Wiring Diagrams: A Complete Guide
Learn how to read HVAC wiring diagrams with our easy-to-follow guide. Master wiring diagrams quickly and confidently.
Aug 8, 2025
Aug 8, 2025
What is a VFD in HVAC? A Practical Explainer
What is a VFD in HVAC? Learn how Variable Frequency Drives work, their key benefits for energy savings, and their most common applications in modern buildings.
Aug 7, 2025
Aug 7, 2025
Your Guide to Refrigerant Pressure Temp Charts
Master the refrigerant pressure temp chart. This guide explains how to read and use PT charts for system diagnosis, charging, and ensuring HVAC efficiency.
Aug 8, 2025
Aug 8, 2025
How to Read HVAC Wiring Diagrams: A Complete Guide
Learn how to read HVAC wiring diagrams with our easy-to-follow guide. Master wiring diagrams quickly and confidently.
Aug 8, 2025
Aug 8, 2025

How to Read a Refractometer for Perfect Results
Learn how to read a refractometer with our expert guide. Get clear, actionable steps for accurate readings and master this essential skill today.
Aug 10, 2025
Aug 10, 2025

Condenser Fan Motors


Pressure Transducers


Sensors

EBUS Horizontal Outside Air Temp/RH Sensor
Aftermarket Part for AAON ASM01836

EBUS Vertical Outside Air Temp/RH Sensor
Aftermarket Part for AAON ASM01838

Duct Mount Humidity/Temp Sensor
Aftermarket Part for Addison 0843P-0586
Duct Euro Humidity/Temperature Sensor
Aftermarket Part for Addison

Outdoor Humidity/Temperature Sensor
Aftermarket Part for Addison 0843P-0587

Room Humidity/Temperature Sensor
Aftermarket Part for Addison

Outdoor Euro Temperature Sensor
Aftermarket Part for Addison

Suction Line Temperature Sensor
Aftermarket Part for Addison 0843P-0838
Variable Frequency Drives

Microchannel Coils

Circuit Breakers


Refrigeration Parts
Soon
0-250psi
Aftermarket Part for Addison 0515P-0783
0-250psi
Aftermarket Part for Addison 0515P-0783
0-250psi
Aftermarket Part for Addison 0515P-0783
0-250psi
Aftermarket Part for Addison 0515P-0783
0-250psi
Aftermarket Part for Addison 0515P-0783
0-250psi
Aftermarket Part for Addison 0515P-0783
0-250psi
Aftermarket Part for Addison 0515P-0783
0-250psi
Aftermarket Part for Addison 0515P-0783
Condenser Fan Motors
Pressure Transducers
Sensors
EBUS Horizontal Outside Air Temp/RH Sensor
Aftermarket Part for AAON ASM01836
EBUS Vertical Outside Air Temp/RH Sensor
Aftermarket Part for AAON ASM01838
Duct Mount Humidity/Temp Sensor
Aftermarket Part for Addison 0843P-0586
Duct Euro Humidity/Temperature Sensor
Aftermarket Part for Addison
Outdoor Humidity/Temperature Sensor
Aftermarket Part for Addison 0843P-0587
Room Humidity/Temperature Sensor
Aftermarket Part for Addison
Outdoor Euro Temperature Sensor
Aftermarket Part for Addison
Suction Line Temperature Sensor
Aftermarket Part for Addison 0843P-0838
Variable Frequency Drives
Microchannel Coils
Circuit Breakers
Refrigeration Parts
Soon
0-250psi
Aftermarket Part for Addison 0515P-0783
0-250psi
Aftermarket Part for Addison 0515P-0783
0-250psi
Aftermarket Part for Addison 0515P-0783
0-250psi
Aftermarket Part for Addison 0515P-0783
0-250psi
Aftermarket Part for Addison 0515P-0783
0-250psi
Aftermarket Part for Addison 0515P-0783
0-250psi
Aftermarket Part for Addison 0515P-0783
0-250psi
Aftermarket Part for Addison 0515P-0783