Back
How to Insulate Pipes A DIY Guide for Energy Savings
Learn how to insulate pipes with this DIY guide. Discover the best materials, tools, and techniques to prevent heat loss, save energy, and protect your home.
Aug 29, 2025
Aug 29, 2025
Table of Contents
Table of Contents
NOTE: This content is for informational purposes only. EPS Controls assumes no liability for what you do with this information—consult a qualified HVAC technician before making changes.
NOTE: This content is for informational purposes only. EPS Controls assumes no liability for what you do with this information—consult a qualified HVAC technician before making changes.

Insulating your pipes is a straightforward job. You’re essentially just wrapping them in materials like foam sleeves or fiberglass tape to cut down on heat loss, keep them from freezing, and stop annoying condensation. Best of all, it's a project you can knock out in a few hours with basic tools, making it one of the smartest DIY moves for your home's energy efficiency.
Why Insulating Your Pipes Is a Weekend Project That Pays Off
Pipe insulation is about more than just dodging a catastrophic burst pipe during a deep freeze. Think of it as a smart, long-term investment in your home's overall health and efficiency. It’s one of those projects that works quietly in the background, but you’ll definitely notice the payoff when you see the savings on your utility bills.

And don't mistake this for a cold-climate-only upgrade. The benefits apply to any property with HVAC and refrigeration systems, making it a valuable project no matter where you live.
The Core Benefits of Pipe Insulation
To do this job right, you first need to understand why you're doing it. The benefits are pretty clear, hitting both your hot and cold water lines in different but equally important ways.
Boosted Energy Efficiency: When you insulate hot water pipes, you slash standby heat loss. The practical result? Water gets to your faucet hotter, and it gets there faster. Your water heater isn't constantly kicking on to keep the water in the pipes warm, which translates directly into lower energy bills.
Moisture and Mold Prevention: We've all seen cold water pipes "sweat" in humid spaces like basements and crawlspaces. That condensation drips everywhere, creating the ideal breeding ground for mold, mildew, and even wood rot in your home's structure. Insulation acts as a vapor barrier, keeping the pipe's surface dry and protecting your home from sneaky water damage.
Protection Against Freezing: Any pipe running through an unheated garage, attic, or crawlspace is a sitting duck in winter. Insulation provides that critical thermal barrier, dramatically reducing the risk of water freezing, expanding, and bursting the pipe—a nightmare repair that can easily run into the thousands.
Insulating pipes isn't just a quick fix; it's fundamental to maintaining a building's entire thermal envelope. Good insulation ensures systems run at consistent temperatures, prevents corrosive condensation from forming, and slashes energy waste in any setting, from a single-family home to a large industrial facility.
This isn't just a niche tip from the pros, either. The global pipe insulation market was valued at an impressive USD 7.7 billion in 2024 and is expected to climb past USD 12 billion by 2032. That kind of growth shows a massive global shift toward better energy conservation and more durable infrastructure. You can dive deeper into the pipe insulation market trends on Verified Market Research.
Choosing the Right Insulation for Your Project
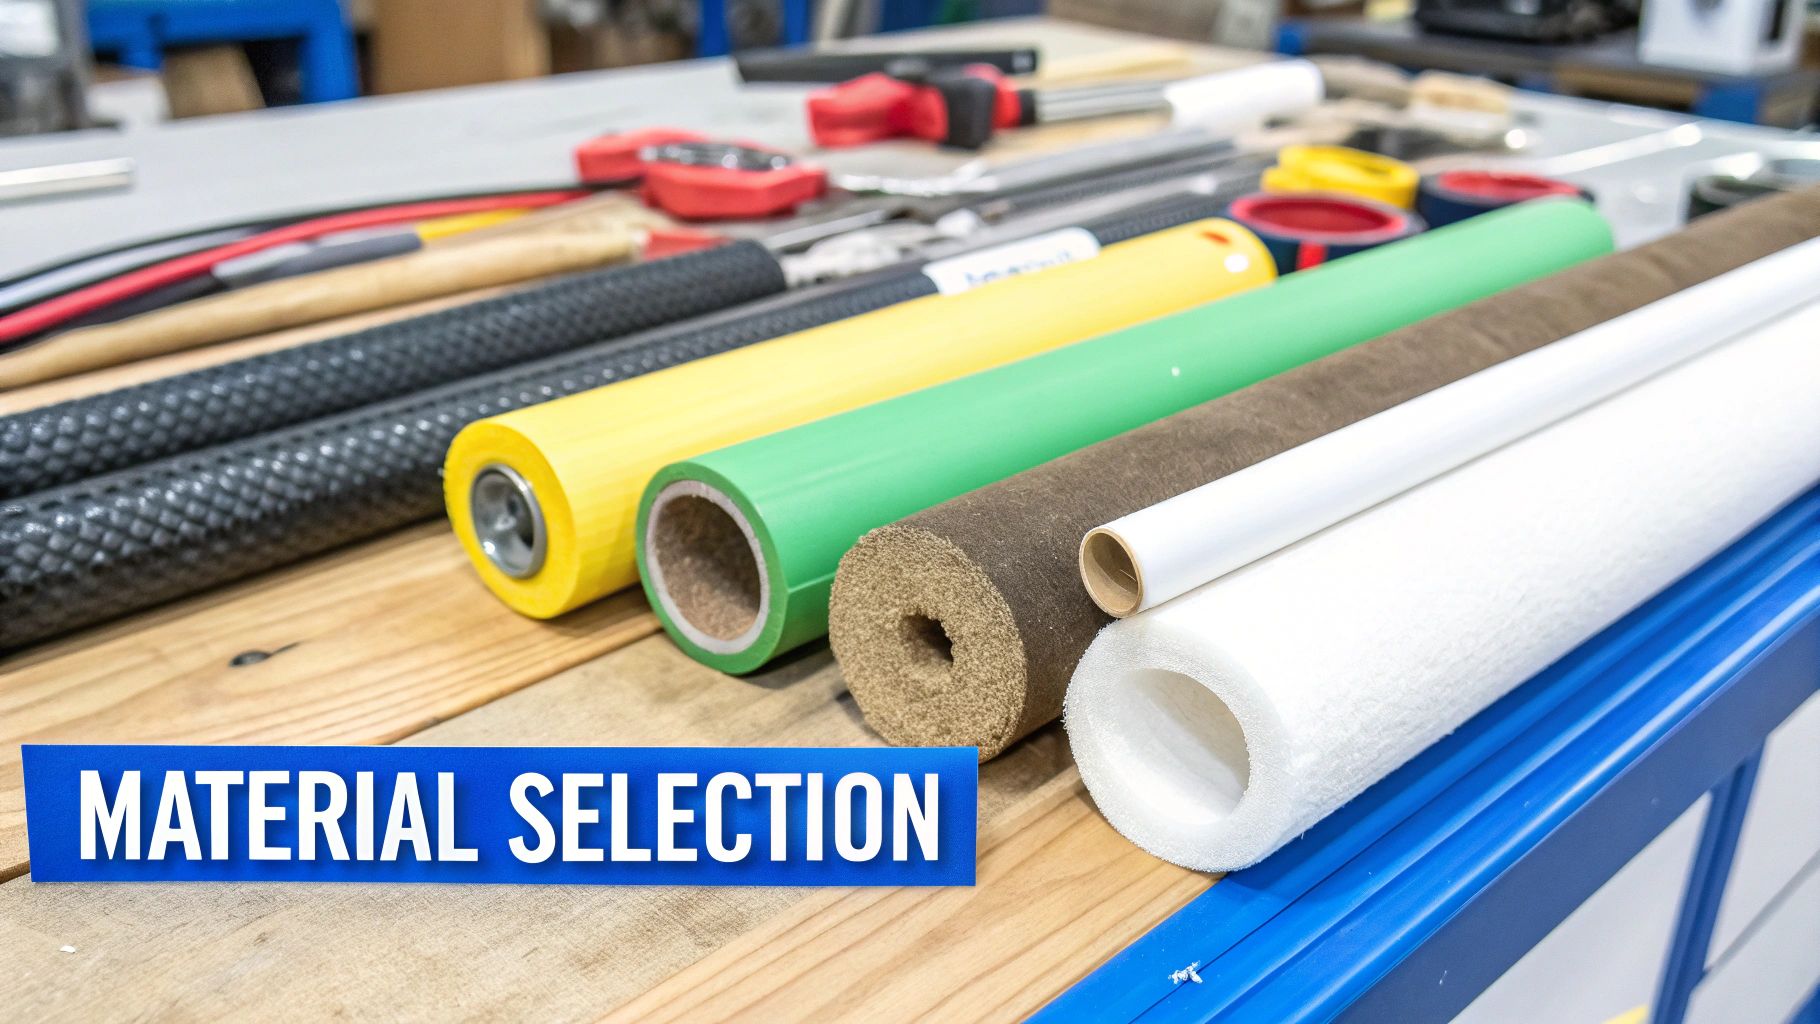
This is the most important decision you'll make for the entire project. I know what it’s like to walk into a hardware store and see a whole aisle of insulation options—it can feel overwhelming. But it’s actually pretty straightforward once you know what you’re looking at.
The best choice really just boils down to your pipe’s location, what it’s carrying, and your budget. An indoor hot water line has completely different needs than an outdoor refrigeration line that's getting blasted by the sun and rain.
Comparing Your Pipe Insulation Options
To help you sort through the options on the shelf, I've put together a quick comparison of the most common materials you'll run into. Think of this as a cheat sheet for matching the right product to your specific job.
Material Type | Best For | Pros | Cons |
|---|---|---|---|
Polyethylene Foam Sleeves | Indoor hot/cold water pipes in residential settings (basements, crawlspaces) | Inexpensive, flexible, incredibly easy for DIYers to install. | Limited temperature range; not durable enough for outdoor use. |
Rubber Foam Insulation | HVAC refrigerant lines, outdoor pipes, and demanding indoor applications. | Excellent durability, UV resistant, handles a wide temperature range. | More expensive than polyethylene; can be stiffer to work with. |
Fiberglass or Mineral Wool | High-temperature lines like steam pipes or industrial applications. | Superior heat resistance (up to 1200°F); non-combustible. | Requires personal protective equipment (gloves, mask) for safe installation. |
As you can see, each material has its place. The market for these materials is actually booming, with a projected jump from USD 5.27 billion to USD 7.2 billion between 2024 and 2030. That growth is being pushed by stricter energy codes and people simply wanting to lower their utility bills. You can find more details on this trend in a market analysis from GlobeNewswire.
Getting Your Measurements Right
Buying the wrong size insulation is a classic rookie mistake. I've seen it happen countless times, and it’s a surefire way to waste time and make extra trips to the store. Trust me, getting accurate measurements from the start is non-negotiable.
First things first, you need the pipe’s nominal diameter. This is the pipe's internal size, and it's how insulation is labeled and sold. Don’t just wrap a tape measure around the outside. Look for markings stamped right on the pipe (e.g., ½", ¾") or use a caliper to measure the outer diameter and find the matching insulation size.
Pro Tip: No markings? No problem. Just wrap a string snugly around the pipe, measure the string's length, and divide that number by 3.14 (pi). That gives you the outer diameter, which you can easily match up to the right nominal size at the store.
Next up is length. Grab a flexible tape measure and carefully follow the entire run of the pipe, including every bend and fitting. Here’s a piece of advice I always give: buy about 10% extra material. This little buffer saves you from the headache of running out of material mid-job and covers any miscuts or small sections you might have missed.
Getting Your Gear Together: The Tools for a Pro-Level Job
Jumping into a job without the right tools is just asking for a headache. I’ve seen it a hundred times: a simple project turns into a day-long ordeal because someone had to keep running back to the garage or the hardware store.
When you're insulating pipes, a little prep goes a long way. Think of it like a chef getting their ingredients ready before they start cooking. Having everything you need laid out and within reach means you can stay focused on the task at hand and get that clean, professional finish you're after.
The Essentials for Your Toolkit
You don’t need a truck full of fancy equipment for this. In fact, you probably have most of what you need already.
A Good Tape Measure: Don't eyeball it. A flexible tape measure will be your best friend, especially when you're dealing with bends and fittings.
A Sharp Utility Knife: This is non-negotiable. A sharp blade gives you clean, straight cuts. A dull one will just tear and mangle foam insulation, leaving you with gaps and a sloppy fit. Insulation shears work great, too.
Cleaning Supplies: This is the step everyone wants to skip, but it’s the most important. Grab a degreasing cleaner and a handful of rags or paper towels.
A Permanent Marker: Perfect for marking your cut lines right on the insulation. It’s a tiny thing that prevents costly mistakes.
That's it. This short list covers the basics for most of the foam sleeve or pipe wrap jobs you'll encounter.
Why You Can't Skip the Prep Work
Before a single piece of insulation touches that pipe, the surface has to be perfectly clean and dry. Pipes in basements and crawlspaces are magnets for dust, cobwebs, and oily grime. If you try to stick a self-sealing foam sleeve onto a dirty pipe, the adhesive won't last. I've seen them pop open in a matter of days.
Take five extra minutes to wipe down every inch of the pipe with a decent degreaser. Seriously. This one step is what makes the self-sealing strips grab on tight and stay put for years. It's the difference between a job that lasts and one you have to redo next season.
And don't forget about your own safety. While the common polyethylene foam is pretty harmless, you might be working with other materials. If your project involves fiberglass or mineral wool insulation, you absolutely need to gear up.
Gloves are a must to keep the tiny fibers from irritating your skin.
Safety Glasses will protect your eyes from any airborne particles.
A Dust Mask is crucial so you don't breathe in those fine fibers.
Once your tools are lined up and your safety gear is on, you're ready to get to the real work.
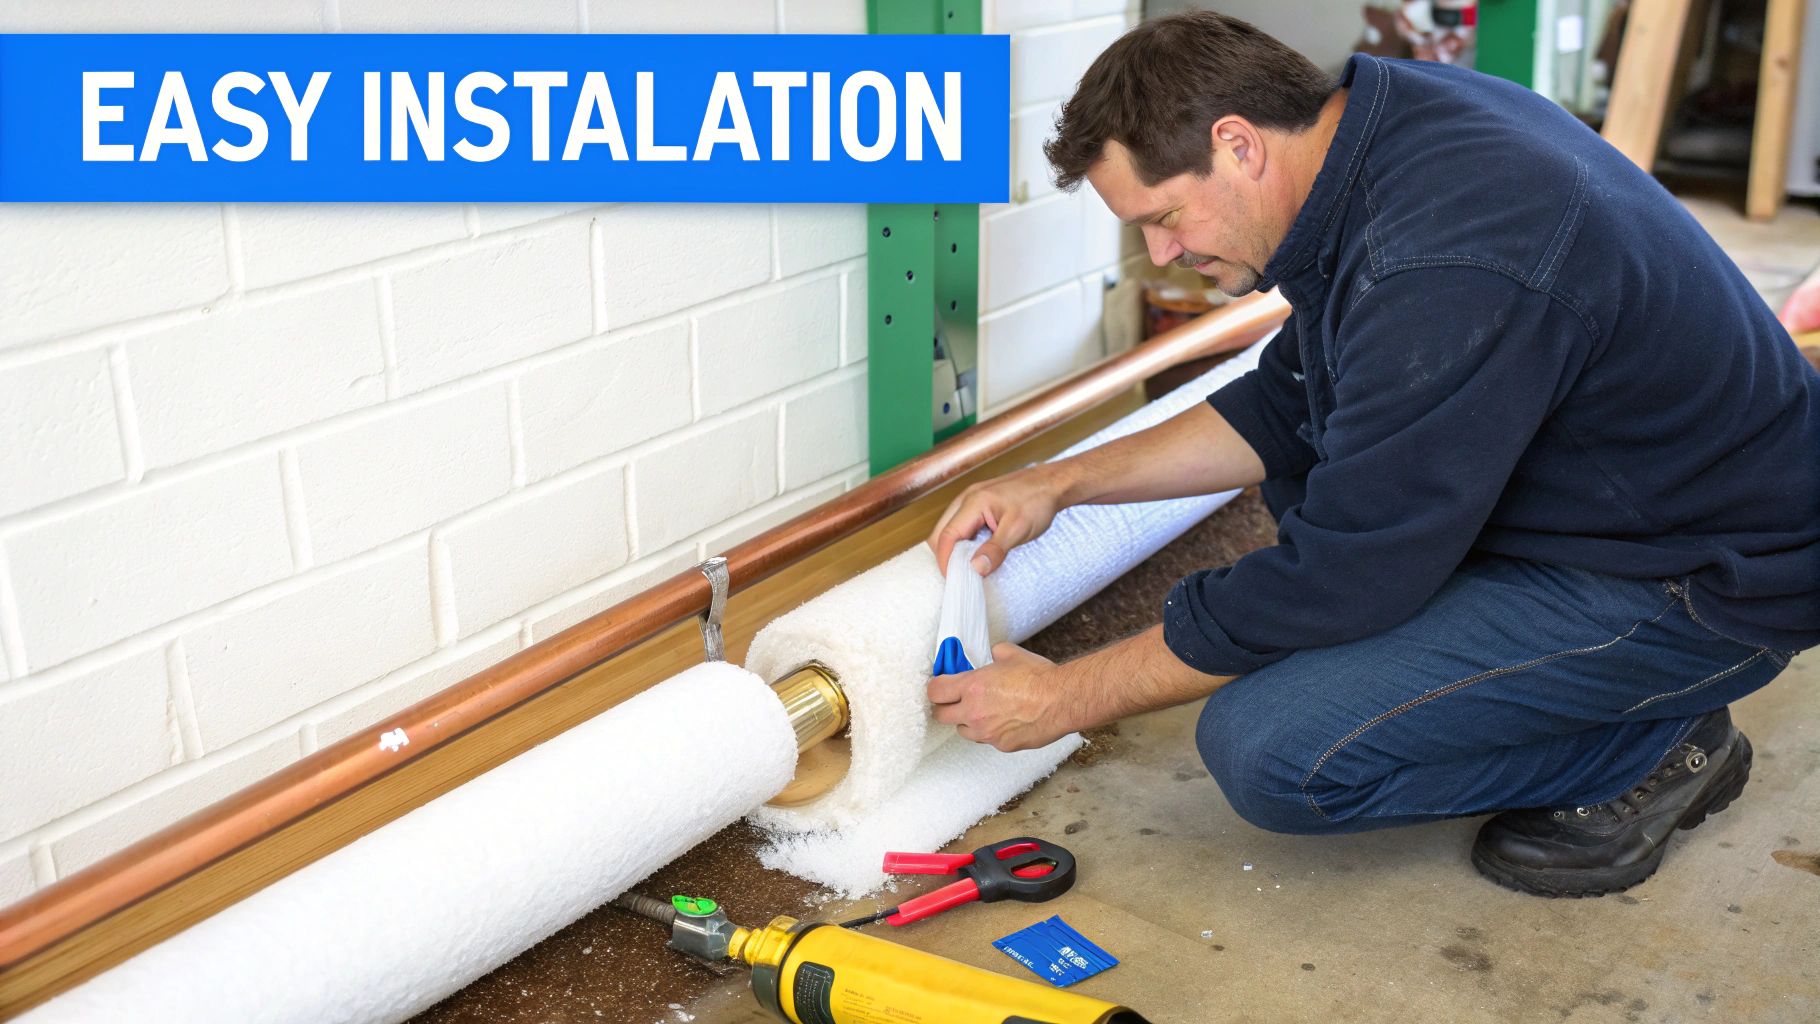
Getting the Insulation On: A Pro's Walkthrough
Alright, you've got your tools laid out and the pipes are clean and ready. Now for the fun part—actually putting the insulation on. This is where your careful prep work really starts to shine. Applying insulation isn't rocket science, but a few pro-level details make all the difference between a slap-dash job and one that will last for years.
The whole point is to create an unbroken thermal shield. Every single gap, no matter how tiny, is a leak. It’s a spot where you're losing energy or, just as bad, inviting condensation to form. Take your time here. A little patience now saves you a lot of headaches later.
And you're not alone in this. The global pipe insulation market was valued at around USD 8.87 billion in 2022 and is only getting bigger. This isn't just a niche industry; it’s a massive global push for better energy efficiency everywhere from homes to factories. You can actually dig into the market drivers over at Grandview Research.
Tackling the Straight Runs
For the long, straight stretches of pipe, pre-slit foam sleeves are an absolute game-changer. They’re built for speed and simplicity, which makes them ideal for pretty much any project.
First, measure the straight section you're insulating. Mark that length on your foam sleeve and make your cut. I can't stress this enough: use a sharp utility knife or proper insulation shears. A dull blade will tear the foam, leaving you with a jagged edge that won't seal properly.
Once it's cut to length, just open the slit along the foam tube and snap it right over the pipe. Most of these sleeves have a self-sealing adhesive strip. Before you peel and stick, give it a quick once-over to make sure the sleeve isn't twisted. Then, pull the film off the adhesive and press the seam down firmly from end to end.
This simple workflow gives a great overview of the process. As you can see, it all comes down to measuring right and sealing tight.
How to Master Bends and Fittings
Elbows, tees, and other fittings are where most DIY jobs fall apart. You can't just force a straight piece of foam around a 90-degree corner; it will buckle and leave a massive gap. The trick is a simple technique called a miter cut.
Here's how you tackle a standard 90-degree elbow:
Grab two pieces of your foam insulation.
At the end of each piece, slice a 45-degree angle. Think of it like making a picture frame.
When you fit those two angled ends together over the elbow, they'll form a perfect, seamless 90-degree turn.
Snap both mitered pieces onto the pipe so they meet flush at the corner. The same idea applies to a T-fitting. You'll cut a 90-degree notch out of the main run of insulation, which creates a perfect saddle for the intersecting pipe's insulation to nestle into.
Pro Tip: Don't just rely on the built-in adhesive for these joints. After fitting your mitered pieces, wrap the seam with a good quality foil tape or use a purpose-made insulation adhesive. This locks the joint down for good and ensures it never pops open.
If you run into more complex, sweeping bends, you can just use several smaller mitered sections to build the curve piece by piece. The goal is always the same: no exposed pipe. Once you get the hang of these basic cuts, you can insulate any pipe configuration you come across, leaving you with a truly professional job that performs flawlessly for the long haul.
Pro Tips from the Field (and Mistakes to Sidestep)
Getting the insulation on is one thing, but making it last and perform is another. The difference between an amateur job and a professional one really comes down to the details. Knowing how to properly insulate pipes means more than just covering the straight runs; it’s about creating a truly unbroken thermal barrier. Let’s go over a few tips I've picked up over the years that will help you avoid common pitfalls.
Don't Leave Your Seams Exposed
One of the biggest mistakes I see is relying solely on the self-sealing adhesive on foam sleeves. It’s a good starting point, but it's just not enough to create a truly bulletproof seal, especially where two pieces meet or at a fitting.
The rule of thumb is simple: seal every single seam, joint, and fitting. A high-quality foil tape is your best friend here. This isn't just a suggestion; it’s what creates a continuous vapor barrier, stopping moisture dead in its tracks. Without it, condensation will find its way in, and you'll end up with wet insulation and corroded pipes.
Think of that foil tape as the final, critical step that turns a bunch of separate pieces into one seamless jacket. This is absolutely essential for refrigerant lines or any cold pipe running through a humid space like a basement.
Stop Crushing Your Insulation
It’s a common rookie mistake, especially with fiberglass wrap: thinking tighter is better. It’s not. In fact, when you compress insulation, you’re actually destroying its effectiveness. The whole point of insulation is to trap air, and when you squeeze it flat, you eliminate those tiny air pockets and tank its R-value.
When you're working with fiberglass or mineral wool wraps, remember:
Lay it snugly around the pipe, but don't stretch it.
The goal is to maintain the material's original fluffiness and thickness.
Use wire or tape to secure it, but only pull it tight enough to keep it from falling off.
This same idea applies to foam sleeves. Forcing a 1/2" sleeve onto a 3/4" pipe stretches the foam thin, creating a weak spot where heat can easily get in or out. Always, always use the right size for the pipe you're working on.
Secure Your Vertical Runs
Gravity will sabotage your work on vertical pipes if you let it. Over a few months, insulation sleeves can start to sag and slide down, leaving the top of the pipe completely bare. That factory adhesive just can't fight that constant downward pull forever.
The fix is incredibly easy. Every 4 to 6 feet, add a little extra support. A simple zip tie pulled snug or a couple of wraps of foil tape around the sleeve and pipe will do the trick. These act as support collars, preventing gravity from winning and keeping your insulation exactly where it needs to be. It’s a tiny step that saves you from having to redo your work down the road.
Your Pipe Insulation Questions Answered
Even when you have a solid plan, questions are bound to pop up in the middle of a project. Getting good answers not only helps you do the job right but also helps you understand the why behind the work. Let’s tackle some of the most common questions I hear from folks insulating their pipes for the first time.
Should I Insulate Both Hot and Cold Water Pipes?
Yes, you absolutely should. A lot of people assume insulation is just for keeping hot water hot or preventing pipes from freezing, but that’s really only half the picture.
Insulating your hot water lines is a classic energy-saving move. It keeps the heat in the pipe, so your water heater doesn't have to work as hard to maintain temperature. This means less standby heat loss, hotter water at the tap, and a noticeable drop in your energy bills. It's a simple win.
But insulating cold water pipes is just as critical, especially if they run through a humid basement or crawl space. It stops condensation—that annoying "pipe sweating"—in its tracks. Without insulation, that condensation drips, leading to water damage, rot, and a perfect environment for mold to grow.
A common blind spot is thinking cold pipe insulation is only about freeze prevention. In most homes, its primary job is moisture control. I tell people to think of it as cheap insurance against the dampness that causes much bigger structural and air quality problems down the road.
What Does Insulation R-Value Mean for Pipes?
In simple terms, R-value measures how well the insulation resists heat flow. The higher the R-value, the better it insulates. It’s that straightforward.
For the vast majority of pipes inside your home, an R-value between R-2 and R-4 is plenty. You don't need to overdo it. The one exception is if you have a pipe running through a truly unconditioned space, like a drafty, frigid attic. In that scenario, grabbing insulation with a higher R-value is smart for that extra layer of protection against the extreme cold.
How Do I Insulate Pipes in Tight Spaces?
This is probably the most frequent problem people run into. You’ve got a pipe wedged right up against a wall or between two floor joists, and there’s no way a standard foam sleeve is going to fit.
When you're in a tight spot, you need to switch to a more flexible material. Here are your go-to options:
Insulation Wrap: This stuff comes on a roll, almost like a thick blanket. You can wrap it snugly around the pipe, and it’ll conform to whatever awkward space you’re working in.
Foil-Backed Foam Tape: This is your secret weapon for small, tricky sections and fittings. It's like a high-performance tape that insulates as it sticks, making it perfect for covering those little gaps nothing else can.
The goal here is 100% coverage. It's perfectly fine to use a different type of insulation for a small section to make sure there are no exposed spots.
How Often Should I Replace Pipe Insulation?
Good-quality insulation can last a very long time, but it’s not something you can just install and completely forget about. I recommend doing a quick visual check once a year, usually in the fall before the cold weather hits.
Keep an eye out for any signs that it's breaking down. Look for cracks, crumbling foam, or any damp spots. Those are all tell-tale signs that the insulation has lost its effectiveness and needs to be replaced. Sometimes, the fix is easy—if the adhesive on a foam sleeve has failed, you can often just secure the seam with a few zip ties or a fresh strip of foil tape and get a few more years out of it.
Insulating your pipes is a straightforward job. You’re essentially just wrapping them in materials like foam sleeves or fiberglass tape to cut down on heat loss, keep them from freezing, and stop annoying condensation. Best of all, it's a project you can knock out in a few hours with basic tools, making it one of the smartest DIY moves for your home's energy efficiency.
Why Insulating Your Pipes Is a Weekend Project That Pays Off
Pipe insulation is about more than just dodging a catastrophic burst pipe during a deep freeze. Think of it as a smart, long-term investment in your home's overall health and efficiency. It’s one of those projects that works quietly in the background, but you’ll definitely notice the payoff when you see the savings on your utility bills.
And don't mistake this for a cold-climate-only upgrade. The benefits apply to any property with HVAC and refrigeration systems, making it a valuable project no matter where you live.
The Core Benefits of Pipe Insulation
To do this job right, you first need to understand why you're doing it. The benefits are pretty clear, hitting both your hot and cold water lines in different but equally important ways.
Boosted Energy Efficiency: When you insulate hot water pipes, you slash standby heat loss. The practical result? Water gets to your faucet hotter, and it gets there faster. Your water heater isn't constantly kicking on to keep the water in the pipes warm, which translates directly into lower energy bills.
Moisture and Mold Prevention: We've all seen cold water pipes "sweat" in humid spaces like basements and crawlspaces. That condensation drips everywhere, creating the ideal breeding ground for mold, mildew, and even wood rot in your home's structure. Insulation acts as a vapor barrier, keeping the pipe's surface dry and protecting your home from sneaky water damage.
Protection Against Freezing: Any pipe running through an unheated garage, attic, or crawlspace is a sitting duck in winter. Insulation provides that critical thermal barrier, dramatically reducing the risk of water freezing, expanding, and bursting the pipe—a nightmare repair that can easily run into the thousands.
Insulating pipes isn't just a quick fix; it's fundamental to maintaining a building's entire thermal envelope. Good insulation ensures systems run at consistent temperatures, prevents corrosive condensation from forming, and slashes energy waste in any setting, from a single-family home to a large industrial facility.
This isn't just a niche tip from the pros, either. The global pipe insulation market was valued at an impressive USD 7.7 billion in 2024 and is expected to climb past USD 12 billion by 2032. That kind of growth shows a massive global shift toward better energy conservation and more durable infrastructure. You can dive deeper into the pipe insulation market trends on Verified Market Research.
Choosing the Right Insulation for Your Project
This is the most important decision you'll make for the entire project. I know what it’s like to walk into a hardware store and see a whole aisle of insulation options—it can feel overwhelming. But it’s actually pretty straightforward once you know what you’re looking at.
The best choice really just boils down to your pipe’s location, what it’s carrying, and your budget. An indoor hot water line has completely different needs than an outdoor refrigeration line that's getting blasted by the sun and rain.
Comparing Your Pipe Insulation Options
To help you sort through the options on the shelf, I've put together a quick comparison of the most common materials you'll run into. Think of this as a cheat sheet for matching the right product to your specific job.
Material Type | Best For | Pros | Cons |
|---|---|---|---|
Polyethylene Foam Sleeves | Indoor hot/cold water pipes in residential settings (basements, crawlspaces) | Inexpensive, flexible, incredibly easy for DIYers to install. | Limited temperature range; not durable enough for outdoor use. |
Rubber Foam Insulation | HVAC refrigerant lines, outdoor pipes, and demanding indoor applications. | Excellent durability, UV resistant, handles a wide temperature range. | More expensive than polyethylene; can be stiffer to work with. |
Fiberglass or Mineral Wool | High-temperature lines like steam pipes or industrial applications. | Superior heat resistance (up to 1200°F); non-combustible. | Requires personal protective equipment (gloves, mask) for safe installation. |
As you can see, each material has its place. The market for these materials is actually booming, with a projected jump from USD 5.27 billion to USD 7.2 billion between 2024 and 2030. That growth is being pushed by stricter energy codes and people simply wanting to lower their utility bills. You can find more details on this trend in a market analysis from GlobeNewswire.
Getting Your Measurements Right
Buying the wrong size insulation is a classic rookie mistake. I've seen it happen countless times, and it’s a surefire way to waste time and make extra trips to the store. Trust me, getting accurate measurements from the start is non-negotiable.
First things first, you need the pipe’s nominal diameter. This is the pipe's internal size, and it's how insulation is labeled and sold. Don’t just wrap a tape measure around the outside. Look for markings stamped right on the pipe (e.g., ½", ¾") or use a caliper to measure the outer diameter and find the matching insulation size.
Pro Tip: No markings? No problem. Just wrap a string snugly around the pipe, measure the string's length, and divide that number by 3.14 (pi). That gives you the outer diameter, which you can easily match up to the right nominal size at the store.
Next up is length. Grab a flexible tape measure and carefully follow the entire run of the pipe, including every bend and fitting. Here’s a piece of advice I always give: buy about 10% extra material. This little buffer saves you from the headache of running out of material mid-job and covers any miscuts or small sections you might have missed.
Getting Your Gear Together: The Tools for a Pro-Level Job
Jumping into a job without the right tools is just asking for a headache. I’ve seen it a hundred times: a simple project turns into a day-long ordeal because someone had to keep running back to the garage or the hardware store.
When you're insulating pipes, a little prep goes a long way. Think of it like a chef getting their ingredients ready before they start cooking. Having everything you need laid out and within reach means you can stay focused on the task at hand and get that clean, professional finish you're after.
The Essentials for Your Toolkit
You don’t need a truck full of fancy equipment for this. In fact, you probably have most of what you need already.
A Good Tape Measure: Don't eyeball it. A flexible tape measure will be your best friend, especially when you're dealing with bends and fittings.
A Sharp Utility Knife: This is non-negotiable. A sharp blade gives you clean, straight cuts. A dull one will just tear and mangle foam insulation, leaving you with gaps and a sloppy fit. Insulation shears work great, too.
Cleaning Supplies: This is the step everyone wants to skip, but it’s the most important. Grab a degreasing cleaner and a handful of rags or paper towels.
A Permanent Marker: Perfect for marking your cut lines right on the insulation. It’s a tiny thing that prevents costly mistakes.
That's it. This short list covers the basics for most of the foam sleeve or pipe wrap jobs you'll encounter.
Why You Can't Skip the Prep Work
Before a single piece of insulation touches that pipe, the surface has to be perfectly clean and dry. Pipes in basements and crawlspaces are magnets for dust, cobwebs, and oily grime. If you try to stick a self-sealing foam sleeve onto a dirty pipe, the adhesive won't last. I've seen them pop open in a matter of days.
Take five extra minutes to wipe down every inch of the pipe with a decent degreaser. Seriously. This one step is what makes the self-sealing strips grab on tight and stay put for years. It's the difference between a job that lasts and one you have to redo next season.
And don't forget about your own safety. While the common polyethylene foam is pretty harmless, you might be working with other materials. If your project involves fiberglass or mineral wool insulation, you absolutely need to gear up.
Gloves are a must to keep the tiny fibers from irritating your skin.
Safety Glasses will protect your eyes from any airborne particles.
A Dust Mask is crucial so you don't breathe in those fine fibers.
Once your tools are lined up and your safety gear is on, you're ready to get to the real work.
Getting the Insulation On: A Pro's Walkthrough
Alright, you've got your tools laid out and the pipes are clean and ready. Now for the fun part—actually putting the insulation on. This is where your careful prep work really starts to shine. Applying insulation isn't rocket science, but a few pro-level details make all the difference between a slap-dash job and one that will last for years.
The whole point is to create an unbroken thermal shield. Every single gap, no matter how tiny, is a leak. It’s a spot where you're losing energy or, just as bad, inviting condensation to form. Take your time here. A little patience now saves you a lot of headaches later.
And you're not alone in this. The global pipe insulation market was valued at around USD 8.87 billion in 2022 and is only getting bigger. This isn't just a niche industry; it’s a massive global push for better energy efficiency everywhere from homes to factories. You can actually dig into the market drivers over at Grandview Research.
Tackling the Straight Runs
For the long, straight stretches of pipe, pre-slit foam sleeves are an absolute game-changer. They’re built for speed and simplicity, which makes them ideal for pretty much any project.
First, measure the straight section you're insulating. Mark that length on your foam sleeve and make your cut. I can't stress this enough: use a sharp utility knife or proper insulation shears. A dull blade will tear the foam, leaving you with a jagged edge that won't seal properly.
Once it's cut to length, just open the slit along the foam tube and snap it right over the pipe. Most of these sleeves have a self-sealing adhesive strip. Before you peel and stick, give it a quick once-over to make sure the sleeve isn't twisted. Then, pull the film off the adhesive and press the seam down firmly from end to end.
This simple workflow gives a great overview of the process. As you can see, it all comes down to measuring right and sealing tight.
How to Master Bends and Fittings
Elbows, tees, and other fittings are where most DIY jobs fall apart. You can't just force a straight piece of foam around a 90-degree corner; it will buckle and leave a massive gap. The trick is a simple technique called a miter cut.
Here's how you tackle a standard 90-degree elbow:
Grab two pieces of your foam insulation.
At the end of each piece, slice a 45-degree angle. Think of it like making a picture frame.
When you fit those two angled ends together over the elbow, they'll form a perfect, seamless 90-degree turn.
Snap both mitered pieces onto the pipe so they meet flush at the corner. The same idea applies to a T-fitting. You'll cut a 90-degree notch out of the main run of insulation, which creates a perfect saddle for the intersecting pipe's insulation to nestle into.
Pro Tip: Don't just rely on the built-in adhesive for these joints. After fitting your mitered pieces, wrap the seam with a good quality foil tape or use a purpose-made insulation adhesive. This locks the joint down for good and ensures it never pops open.
If you run into more complex, sweeping bends, you can just use several smaller mitered sections to build the curve piece by piece. The goal is always the same: no exposed pipe. Once you get the hang of these basic cuts, you can insulate any pipe configuration you come across, leaving you with a truly professional job that performs flawlessly for the long haul.
Pro Tips from the Field (and Mistakes to Sidestep)
Getting the insulation on is one thing, but making it last and perform is another. The difference between an amateur job and a professional one really comes down to the details. Knowing how to properly insulate pipes means more than just covering the straight runs; it’s about creating a truly unbroken thermal barrier. Let’s go over a few tips I've picked up over the years that will help you avoid common pitfalls.
Don't Leave Your Seams Exposed
One of the biggest mistakes I see is relying solely on the self-sealing adhesive on foam sleeves. It’s a good starting point, but it's just not enough to create a truly bulletproof seal, especially where two pieces meet or at a fitting.
The rule of thumb is simple: seal every single seam, joint, and fitting. A high-quality foil tape is your best friend here. This isn't just a suggestion; it’s what creates a continuous vapor barrier, stopping moisture dead in its tracks. Without it, condensation will find its way in, and you'll end up with wet insulation and corroded pipes.
Think of that foil tape as the final, critical step that turns a bunch of separate pieces into one seamless jacket. This is absolutely essential for refrigerant lines or any cold pipe running through a humid space like a basement.
Stop Crushing Your Insulation
It’s a common rookie mistake, especially with fiberglass wrap: thinking tighter is better. It’s not. In fact, when you compress insulation, you’re actually destroying its effectiveness. The whole point of insulation is to trap air, and when you squeeze it flat, you eliminate those tiny air pockets and tank its R-value.
When you're working with fiberglass or mineral wool wraps, remember:
Lay it snugly around the pipe, but don't stretch it.
The goal is to maintain the material's original fluffiness and thickness.
Use wire or tape to secure it, but only pull it tight enough to keep it from falling off.
This same idea applies to foam sleeves. Forcing a 1/2" sleeve onto a 3/4" pipe stretches the foam thin, creating a weak spot where heat can easily get in or out. Always, always use the right size for the pipe you're working on.
Secure Your Vertical Runs
Gravity will sabotage your work on vertical pipes if you let it. Over a few months, insulation sleeves can start to sag and slide down, leaving the top of the pipe completely bare. That factory adhesive just can't fight that constant downward pull forever.
The fix is incredibly easy. Every 4 to 6 feet, add a little extra support. A simple zip tie pulled snug or a couple of wraps of foil tape around the sleeve and pipe will do the trick. These act as support collars, preventing gravity from winning and keeping your insulation exactly where it needs to be. It’s a tiny step that saves you from having to redo your work down the road.
Your Pipe Insulation Questions Answered
Even when you have a solid plan, questions are bound to pop up in the middle of a project. Getting good answers not only helps you do the job right but also helps you understand the why behind the work. Let’s tackle some of the most common questions I hear from folks insulating their pipes for the first time.
Should I Insulate Both Hot and Cold Water Pipes?
Yes, you absolutely should. A lot of people assume insulation is just for keeping hot water hot or preventing pipes from freezing, but that’s really only half the picture.
Insulating your hot water lines is a classic energy-saving move. It keeps the heat in the pipe, so your water heater doesn't have to work as hard to maintain temperature. This means less standby heat loss, hotter water at the tap, and a noticeable drop in your energy bills. It's a simple win.
But insulating cold water pipes is just as critical, especially if they run through a humid basement or crawl space. It stops condensation—that annoying "pipe sweating"—in its tracks. Without insulation, that condensation drips, leading to water damage, rot, and a perfect environment for mold to grow.
A common blind spot is thinking cold pipe insulation is only about freeze prevention. In most homes, its primary job is moisture control. I tell people to think of it as cheap insurance against the dampness that causes much bigger structural and air quality problems down the road.
What Does Insulation R-Value Mean for Pipes?
In simple terms, R-value measures how well the insulation resists heat flow. The higher the R-value, the better it insulates. It’s that straightforward.
For the vast majority of pipes inside your home, an R-value between R-2 and R-4 is plenty. You don't need to overdo it. The one exception is if you have a pipe running through a truly unconditioned space, like a drafty, frigid attic. In that scenario, grabbing insulation with a higher R-value is smart for that extra layer of protection against the extreme cold.
How Do I Insulate Pipes in Tight Spaces?
This is probably the most frequent problem people run into. You’ve got a pipe wedged right up against a wall or between two floor joists, and there’s no way a standard foam sleeve is going to fit.
When you're in a tight spot, you need to switch to a more flexible material. Here are your go-to options:
Insulation Wrap: This stuff comes on a roll, almost like a thick blanket. You can wrap it snugly around the pipe, and it’ll conform to whatever awkward space you’re working in.
Foil-Backed Foam Tape: This is your secret weapon for small, tricky sections and fittings. It's like a high-performance tape that insulates as it sticks, making it perfect for covering those little gaps nothing else can.
The goal here is 100% coverage. It's perfectly fine to use a different type of insulation for a small section to make sure there are no exposed spots.
How Often Should I Replace Pipe Insulation?
Good-quality insulation can last a very long time, but it’s not something you can just install and completely forget about. I recommend doing a quick visual check once a year, usually in the fall before the cold weather hits.
Keep an eye out for any signs that it's breaking down. Look for cracks, crumbling foam, or any damp spots. Those are all tell-tale signs that the insulation has lost its effectiveness and needs to be replaced. Sometimes, the fix is easy—if the adhesive on a foam sleeve has failed, you can often just secure the seam with a few zip ties or a fresh strip of foil tape and get a few more years out of it.
Keep Reading
Related Articles

What is a VFD in HVAC? A Practical Explainer
What is a VFD in HVAC? A Practical Explainer
What is a VFD in HVAC? Learn how Variable Frequency Drives work, their key benefits for energy savings, and their most common applications in modern buildings.
Aug 7, 2025
Aug 7, 2025

Your Guide to Refrigerant Pressure Temp Charts
Your Guide to Refrigerant Pressure Temp Charts
Master the refrigerant pressure temp chart. This guide explains how to read and use PT charts for system diagnosis, charging, and ensuring HVAC efficiency.
Aug 8, 2025
Aug 8, 2025

How to Read HVAC Wiring Diagrams: A Complete Guide
How to Read HVAC Wiring Diagrams: A Complete Guide
Learn how to read HVAC wiring diagrams with our easy-to-follow guide. Master wiring diagrams quickly and confidently.
Aug 8, 2025
Aug 8, 2025
What is a VFD in HVAC? A Practical Explainer
What is a VFD in HVAC? Learn how Variable Frequency Drives work, their key benefits for energy savings, and their most common applications in modern buildings.
Aug 7, 2025
Aug 7, 2025
Your Guide to Refrigerant Pressure Temp Charts
Master the refrigerant pressure temp chart. This guide explains how to read and use PT charts for system diagnosis, charging, and ensuring HVAC efficiency.
Aug 8, 2025
Aug 8, 2025
How to Read HVAC Wiring Diagrams: A Complete Guide
Learn how to read HVAC wiring diagrams with our easy-to-follow guide. Master wiring diagrams quickly and confidently.
Aug 8, 2025
Aug 8, 2025

How to Read a Refractometer for Perfect Results
Learn how to read a refractometer with our expert guide. Get clear, actionable steps for accurate readings and master this essential skill today.
Aug 10, 2025
Aug 10, 2025

Condenser Fan Motors


Pressure Transducers


Sensors

EBUS Horizontal Outside Air Temp/RH Sensor
Aftermarket Part for AAON ASM01836

EBUS Vertical Outside Air Temp/RH Sensor
Aftermarket Part for AAON ASM01838

Duct Mount Humidity/Temp Sensor
Aftermarket Part for Addison 0843P-0586
Duct Euro Humidity/Temperature Sensor
Aftermarket Part for Addison

Outdoor Humidity/Temperature Sensor
Aftermarket Part for Addison 0843P-0587

Room Humidity/Temperature Sensor
Aftermarket Part for Addison

Outdoor Euro Temperature Sensor
Aftermarket Part for Addison

Suction Line Temperature Sensor
Aftermarket Part for Addison 0843P-0838
Variable Frequency Drives

Microchannel Coils

Circuit Breakers


Refrigeration Parts
Soon
0-250psi
Aftermarket Part for Addison 0515P-0783
0-250psi
Aftermarket Part for Addison 0515P-0783
0-250psi
Aftermarket Part for Addison 0515P-0783
0-250psi
Aftermarket Part for Addison 0515P-0783
0-250psi
Aftermarket Part for Addison 0515P-0783
0-250psi
Aftermarket Part for Addison 0515P-0783
0-250psi
Aftermarket Part for Addison 0515P-0783
0-250psi
Aftermarket Part for Addison 0515P-0783
Condenser Fan Motors
Pressure Transducers
Sensors
EBUS Horizontal Outside Air Temp/RH Sensor
Aftermarket Part for AAON ASM01836
EBUS Vertical Outside Air Temp/RH Sensor
Aftermarket Part for AAON ASM01838
Duct Mount Humidity/Temp Sensor
Aftermarket Part for Addison 0843P-0586
Duct Euro Humidity/Temperature Sensor
Aftermarket Part for Addison
Outdoor Humidity/Temperature Sensor
Aftermarket Part for Addison 0843P-0587
Room Humidity/Temperature Sensor
Aftermarket Part for Addison
Outdoor Euro Temperature Sensor
Aftermarket Part for Addison
Suction Line Temperature Sensor
Aftermarket Part for Addison 0843P-0838
Variable Frequency Drives
Microchannel Coils
Circuit Breakers
Refrigeration Parts
Soon
0-250psi
Aftermarket Part for Addison 0515P-0783
0-250psi
Aftermarket Part for Addison 0515P-0783
0-250psi
Aftermarket Part for Addison 0515P-0783
0-250psi
Aftermarket Part for Addison 0515P-0783
0-250psi
Aftermarket Part for Addison 0515P-0783
0-250psi
Aftermarket Part for Addison 0515P-0783
0-250psi
Aftermarket Part for Addison 0515P-0783
0-250psi
Aftermarket Part for Addison 0515P-0783